Wednesday, March 11, 2015

A Dinner Inspired by Downton Abbey

Spring is just around the corner.  My daffodils are 1 inch above the ground, desperate to continue shooting out of their underground shelter. While I wait for spring, I pass the time planning parties and dinners!


Over President's weekend I celebrated a wonderful Downton Abbey inspired dinner with recipes from The Unofficial Downton Abbey Cookbook. 


The festivities took place in Chincoteague Island, Virginia with family and friends. We enjoyed a wonderful 6 course dinner: In keeping with the spirit of Downton Abbey, we dressed as though it were the Roaring 20’s. Flapper dresses and derby hats were all the rage. So was the food.


Downton Abbey 6 Course Dinner
First Course
Mrs. Patmore's London Particular

Second Course
 Flounder Paupiettes with Butter Parsley Sauce

Third Course
Seven Hour Leg of Lamb with Almond Fig Sauce

Fourth Course
Yorkshire Puddings
Decadent Potatoes Duchess
Roasted Brussels Sprouts

Fifth Course
Bosc Pear and Stilton Salad with Port Wine Dressing

Sixth Course
Floating Islands with Bourbon-Custard Sauce (Recipe follows)
English Eccles Cake with Vanilla Custard Pudding Sauce (Recipe for the cake follows)
Almond Cream Cakelettes 


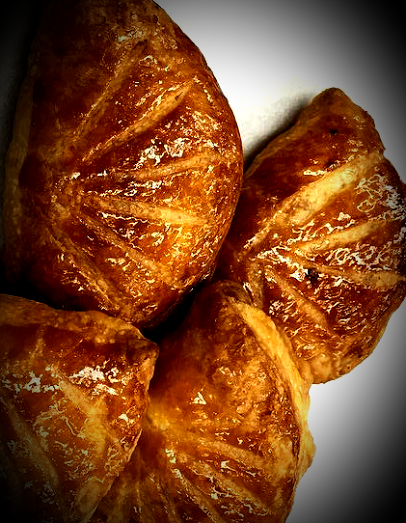
Two of my favorites from the menu are Floating Islands (Ile Flottante) and English Eccles Cake. The recipe for Ile Flottante is inspired by Downton Abbey while the English Eccles Cake is a modified version of the recipe found in the cookbook. Floating Islands is a dessert of light, airy meringues swimming in crème anglaise. The English Eccles Cake is not a cake so much as a puff pastry delicacy. I hope you enjoy them as much as we did.

Floating Islands (Ile Flottante)
Yield: 10 Servings
Ingredients
For the Crème Anglaise
750mL (1⅓ pint) milk
1 vanilla bean, scraped
8 free-range egg yolks
190g sugar

For the Meringue
8 free-range egg whites
1 tsp Cream of tartar
190g sugar

For the Caramel
75g sugar

Procedure
To Make the Crème Anglaise:
1. In a saucepan over medium heat, bring the milk, vanilla pod, and vanilla beans just to a boil.
2. Meanwhile, in a bowl, whisk the egg yolks and sugar together (blanchir) so they are well mixed and light in color.
3. When the milk comes to a boil, temper the egg yolk/sugar mixture. Do this by slowly adding the milk while whisking. You can also add the milk a little at a time and then whisk it quickly.
4. When the milk has been completely added to the egg yolks and sugar, return the mixture to the saucepan and heat until nappant. Nappant is when the mixture coats the back of the wooden spoon and stays separated after running your finger along the back of the spoon. It should reach a temperature of 170°F.
5. Place a bowl with a sieve over an ice bath.
6. Strain the crème anglaise through the sieve. Let the bowl sit in the ice bath to cool. Refrigerate until ready to use.

To Make the Meringue:
1. Preheat the oven to 350°F.
2. In the bowl of stand mixer, whisk the egg whites and cream of tartar to soft peaks..
3. Add the sugar to the egg whites one tablespoon at a time and continue whisking until the mixture comes to stiff peaks. The meringue will be thick and glossy. 
4. Using a pastry bag, pipe the meringue into lightly greased small silicone molds. If you don’t have a mold, you can pipe meringues into cloud-like shapes onto a silicone mat.
5. Bake in 350°F for about 10 to 12 minutes. They will puff like soufflés. Remove from the oven and let them cool down. Invert onto a plate and set aside. If you piped them onto a silicone mat, gently use an offset spatula to place them on the plate.

To Make the Caramel:
1. Pour the sugar into a clean saucepan.
2. Stirring with a wooden spoon, melt the sugar slowly over medium heat until it turns a dark copper color.
3. Remove the saucepan immediately from the heat to ensure the caramel does not burn.

To Assemble:
1. On a serving tray, pour a generous pool of crème anglaise.
2. Place meringues in the crème anglaise.  
3. Gently pour the caramel over the meringues. 


English Eccles Cake
Yield: 8 servings
Ingredients for the Cake
4 TBSP unsalted butter
1 Cup dried currants
2 TBSP candied orange fruit peel, chopped
1/2 Cup dark brown sugar
1/2 Tsp allspice
1/4 Tsp nutmeg
1/4 Tsp cinnamon
1/2 Cup brandy 
1 Lb frozen puff pastry, thawed
1/4 cup whole milk
1 large egg, beaten

Procedure
1. Preheat oven to 400°F.
2. In a saucepan over medium heat, melt butter.
3. Stir currants, fruit peel, brown sugar, allspice, nutmeg, cinnamon and brandy into melted butter. Mix thoroughly until sugar is dissolved and fruit is coated. Remove from heat.
3. On a clean, lightly floured surface, roll out thawed pastry until it is 1/4-inch thick. Cut out eight (5 inch) circles (Save remaining pastry dough for other recipes).
4. Dividing currant mixture evenly among circles, place currant mixture on one-half of the circle. Leave a ½ inch border.
5. Moisten edges of pastries with a little bit of milk and fold the circle to cover the filling. Pinch to seal.
6. Brush cakes with beaten egg, then sprinkle with white sugar. Make three parallel cuts across the top of each cake, then place on a baking sheet layered with parchment paper. 
7. Bake pastries in preheated oven for 15-20 minutes or until golden brown. Remove and sprinkle with a little more sugar, then serve.


I encourage you to have your own Downton Abbey tribute. Whether you dress up or keep it casual, I guarantee it is a great way to spend time while waiting for Spring to arrive.  


Saturday, February 14, 2015

Chocolate Bon Bons with Passion Fruit Ganache Filling

Happy (Belated) New Year! 2015 is a new year. We shift our focus and wipe the slate clean to start out on a new path. Yesterday is no more and tomorrow doesn't exist yet. Only today is our focus...living in the present as we embark on this new path day by day. How exciting!

Some dislike January but to me, it brings the hope of Spring. My chickens started looking for shoots in the still green-yellowish grass before the snows came. "Not yet," I told them. "We must wait during the cold months of January and February." 


They have hope. I, too, have hope. 


Where January symbolizes hope, February symbolizes love. Love of nature, life, people, home, knowledge, food, drink, gardening...what's not to love? It is our opportunity to give love to everything.


Hope and love are two beautiful forces that are one and the same. Chocolate is the physical manifestation of these two. I believe hope, love, and chocolate are the same force. They are my version of the three musketeers.


To me, chocolate bonbons with passion fruit ganache filling embody hope, love, and chocolate. Love is represented in the heart-shaped bonbons while hope is represented in the passion fruit filling. And of course, there is chocolate in all its glory: dark chocolate for the shell, milk chocolate for the ganache, and white chocolate for the decorations. Sometimes, I like to be creative and decorate my bonbons as though they are works of art. 


My wish for you is to taste love, hope, and chocolate in each of these bonbons.    


Chocolate Bonbons with Passion Fruit Ganache Filling

To watch how to make them, go to this link: 

Chocolate Shell
1,000 g Tempered dark chocolate (I prefer the seeding method:
https://www.youtube.com/watch?v=bydThAkiHzI&index=8&list=PLAWpIBpOvRSJa8KNjNwUtSojHovkMX2Ul)


Passion Fruit Ganache Filling
Yield: 460 grams
Enough for 60 bonbons

100 g Cream
10 g Honey
250 g Milk chocolate, chopped
100 g Passion fruit puree at room temperature
20 g Butter, cubed


Decorations
Gold luster dust
Gold leaf
Red and white chocolate
Small brushes

Procedure

1. Place milk chocolate in a large bowl and set aside.
2. In a saucepan over medium heat, heat cream and honey until the mixture simmers.
3. Pour cream over milk chocolate and let it rest undisturbed for 5 minutes.

4. With a small whisk, gently emulsify the chocolate, honey, and cream. Begin by whisking the mixture in the center only. Then, gradually broaden your whisking to incorporate all the chocolate in the bowl. 
5. Continue gently whisking until the chocolate is fully incorporated and the mixture is smooth and shiny.

6. Set aside to cool to slightly warmer than body temperature (100 degrees F) so it will be easier to pipe. 

Procedure for the Bonbons
1. Use clean, dry bonbon molds. Quickly pour the tempered chocolate shell into the mold. Make sure each of the individual sections are completely filled. 
2. Remove excess chocolate from the top of the mold with a spatula into a bowl.  
3. Tap the bonbon mold with the handle of your offset spatula to remove air bubbles. Once all the air bubbles are removed, pour the excess chocolate from the mold into a bowl. You want there to be a thin layer of chocolate in the mold for the bonbons.
4. Flip the mold upside down on a baking rack for about 2 minutes. After 2 minutes, clean the excess chocolate off using a scraper. Make sure the chocolate is flush with the mold so no excess is sticking up. This will ensure uniform bonbons.
5. Cut a small hole in a pastry bag (there is no need to use a piping tip for this). Pour the ganache in a pastry bag and pipe small mounds in each bonbon shell 3/4 of the way full. Make sure to leave space so the bonbon can be sealed with chocolate.
6. Pour tempered dark chocolate over the top carefully just to completely cover the bonbons. 
7. Once covered, tap the mold to remove air bubbles. Carefully scrape the excess chocolate into a bowl so the bonbons will be flat on the bottom. Keep your scraper flush with the mold to avoid disrupting the ganache filling.
8. Put the bonbon mold in the refrigerator for 10 minutes. When the molds look somewhat clear, the chocolate has shrunk away from the mold. They are ready to be unmolded. 
9. Remove the mold from the refrigerator. Turn the mold upside down to turn the bonbons out. 
10. Using a small brush, decorate the bonbons by brushing them with red or white chocolate. Gently brush gold luster dust or place gold leaf decorations for added effect. Enjoy! 


Tuesday, December 16, 2014

The Gingerbread Church

Have I said how much I love the holidays? I love the holidays! One of the things I look forward to the most is creating gingerbread structures. It has become my tradition since 2010. This year, I decided to replicate a historic 1900 Episcopal church as I love the architecture.


This is a week-long labor of love. I play holiday music while I work to get in the Christmas spirit. I spend days designing and constructing the church. In addition, I prepare a dessert buffet which I will present at the gingerbread church's unveiling. 

The walls and steeple are made out of gingerbread. Everything is in the details as some say, so I take my time carving the “bricks” and designs into the walls and steeple. Once I get started, I can’t stop. 


Nearly every church has stained glass windows and this one is no exception. The windows of my church are made from poured sugar. Poured sugar consists of cooking water and sugar to a high temperature, adding glucose, and cooking it even more. Once it reaches the desired temperature the poured sugar can be colored and poured into molds. In this case, the molds are cut-outs in the gingerbread church walls. Once the sugar has set the stained glass windows are complete. To highlight the beauty of the stained glass, I install lighting inside the church. 


The church is not complete until the doors, the roof and the landscape are decorated with royal icing. I get lost while decorating. Although it is time consuming I enjoy every minute of it.


The church doors:


Close-up of the landscape:


While the gingerbread church was being created, this came together for the edible edifice's unveiling: 

The Menu for the December 2014 Gathering:  

* Passion fruit cheeseflan
* Mini lemon and blueberry jam trifles
* Milk chocolate mousse
* Stollen
* Almond cakelettes with an assortment of creams
* Pumpkin apple cake pudding 
* Egg nog
* Meringue cookies 'Brutti ma buoni'
* A village of cocoa-gingerbread houses petits fours
* Truffles
* Crystallized Almonds
* Linzer tart and Flamande tart

One week later, the gingerbread church and the dessert buffet are ready for their unveiling at the rectory of Father Ron Pollock in Somerville, NJ:


From my friends and family to yours, I wish you the happiest of holidays!


Tuesday, December 9, 2014

Presenting The Bûche de Noël

The holiday season is a time of family, friendship and food – three things I enjoy immensely. The tree is decorated, gifts are wrapped, and the Bûche de Noël is ready to make its appearance.

Popular in France, the Bûche de Noël, literally meaning “yule log”, is a light, fluffy sponge cake filled with jam or preserves and covered in buttercream. The log is cut with the ends strategically placed to give the appearance of a chopped tree branch while the buttercream is “carved” with a fork to emulate tree bark. The cake can be decorated with meringue snowmen, mushrooms, candies or actual floral items. It is lovely to look and even lovelier to eat. The Bûche de Noël is perfect for entertaining loved ones at the holiday season.

This year, perhaps Santa would appreciate a slice of the Bûche de Noël instead of cookies.  
 
Recipe for Bûche de Noël
Ingredients
Sponge Cake
Soaking syrup (simple syrup spiked with liquor)
Filling
Chocolate Buttercream

Ingredients for the Sponge Cake
4 egg whites
125 gm granulated sugar
4 egg yolks
125 gm cake flour, sifted
60 gm butter, melted but not hot

Procedure
1. Preheat the oven to 350°F. Spray a half sheet pan with cooking spray; line the pan with parchment paper and set aside.
2. Prepare a French meringue with the egg whites: In the bowl of a stand mixer fitted with whisk attachment, whisk the egg whites and sugar to stiff peak.
3. In a separate bowl, whisk egg yolks.
4. Fold egg yolks into French meringue.
5. Fold sifted cake flour into the meringue in 1/3’s.
6. Remove about 1 cup of batter and place in a separate bowl. Fold melted butter into this batter.
7. Fold melted butter/batter into remaining batter.
8. Pour batter into sheet pan and gently spread evenly.
9. Bake for 5-7 minutes, rotating pan halfway so cake cooks evenly. Cake is done when it is browned evenly, springs back to the touch, and pulls away from the sides of the pan.
10. Upon removing cake from oven, turn it onto a cooled pan or baking rack.

Ingredients for the Filling
100 gm heavy cream
25 gm powdered sugar
50 gm cranberry preserves or other desired flavor

Procedure
1. In the mixing bowl of a stand mixer fitted with whisk attachment, add heavy cream and powdered sugar. Make sure the bowl and heavy cream are both cold.
2. Whip the heavy cream until medium peaks.
3. Gently fold in the cranberry preserves.
4. Refrigerate until ready to use.

Ingredients for the Buttercream
75 gm egg whites
150 gm granulated sugar
75 mL water
35 gm granulated sugar
225 gm butter, cubed
Pinch of salt
Pinch of cream of tartar
200 gm chocolate, melted over double boiler

Procedure
1. In a saucepan, combine 150 gm granulated sugar and water. Using your finger or small spatula, gently stir sugar into water being careful not to get sugar on sides of saucepan. If this happens, use a wet brush to remove sugar crystals.
2. Cook sugar to soft-ball stage (238°F). Do not stir the sugar while it is cooking.
3. Prepare Bain Marie and melt chocolate. Once chocolate is melted, set aside so it cools to room temperature.
4. When the sugar begins to boil, prepare an Italian meringue: Add egg whites, remaining 35 gm sugar, pinch of salt and cream of tartar to a mixing bowl of a stand mixer fitted with whisk attachment. Whisk egg whites to medium peak. If medium peak is reached before sugar reaches soft-ball stage, lower speed on mixer. Do not turn mixer off.
5. When sugar reaches soft ball stage, pour sugar into mixer with Italian meringue, being careful not to pour onto whisk.
6. Increase mixer to high speed until meringue is at room temperature.
7. Gradually add cubes of butter until thoroughly combined. Continue mixing until the buttercream is the consistency of mayonnaise.
8. Fold the melted chocolate into the buttercream.

Assembling the Bûche de Noël
1. When cake has cooled, brush with soaking syrup.
2. Spread cake with a thin layer of buttercream.
3. Place the cake in front of you so the long edge is next to you. Roll the cake into a log.
4. Cover the log with buttercream.
5. Using a serrated knife, cut the ends of the log off in a diagonal.
6. Place the ends on top of the log to resemble branches.
7. Completely cover the cake with buttercream.
8. Using a fork, score the frosted cake so it resembles tree bark.


9. Cake can be decorated with meringue, marzipan characters, or other decorations. You can also gently sift powdered sugar over the cake to give the appearance of snow.


Sunday, November 23, 2014

A New Take on the Thanksgiving Meal


The holidays are approaching. The smell of wood burning in fireplaces, the feel of cool, nippy air caressing your face, the autumn chore of raking of orange, red, yellow and brown leaves; this puts me in party mode.

I start planning my Thanksgiving dinner in October, going through many ideas before deciding upon the final menu. This year’s holiday feast will kick off with appetizers of Stilton gougères, which are little pillows of dough and Stilton. They will be followed by a hot and delicious carrot and beet soup, scarlet in color and served with one large tempura shrimp.

For the entrée, a cassoulet. This is a slow-roasted, French casserole comprised of duck, sausages, lamb and cannellini beans. To make it fit Thanksgiving, I will add turkey meat. Side dishes of braised leeks, roasted brussel sprouts with chorizo, and roasted fall vegetables will complement the cassoulet. I'm hungry already! 

Once finished, an intermezzo of Raspberry port sorbet will serve as a tasty palate cleanser.

For dessert, a dramatic presentation of baked Alaska consisting of layers of chestnut, vanilla, and cranberry ice creams covered in clouds of Swiss meringue. Instead of baking it in the oven, I will flambé the baked Alaska at the table for my guests. While the flames are dancing I will sprinkle cinnamon powder for sparkles.

After dessert we will enjoy coffee, chocolates and post prandials next to a vigorous and toasty wood fireplace in the sitting room.

Let's start planning our dinners, setting the tables, coordinating the dishes, and playing the jazz sounds of Michael Bubblé, Ella Fitzgerald and Rod Stewart. Enjoy the holidays to come. Salud!


Baked Alaska (8 – 10 servings)
*It is best to start preparation the day prior. The Swiss Meringue needs to be made the day the Baked Alaska is served.

Sponge Cake (recipe follows)
2-3 Flavors of your favorite ice cream and/or sorbet
Swiss Meringue (recipe follows)

Equipment
Loaf pan lined generously with plastic wrap
Pastry bag with a star tip

Sponge Cake Recipe (for 9 inch cake or half sheet (13"x16") pan)
Ingredients
125 grams cake flour
35 grams butter
5 eggs
125 grams sugar

Procedure
1. Preheat the oven to 350°F.  Line a cake pan or half-sheet tray with parchment paper and set aside.
2. Warm the butter until it is melted. Set aside and keep warm but not hot.
3. Sift the cake flour and set aside.
4. While butter is melting, place eggs and sugar in a bowl over a Bain Marie. Whisk until they are slightly warmer than body temperature (110°F). (Hint: when testing the temperature with your finger it will feel warm but not hot.)
5. In a mixing bowl fitted with whisk attachment, whip warmed eggs and sugar until triple in volume.
6. Gradually add the cake flour in 1/3’s and fold after each addition into the eggs/sugar.
7. Remove 1 cup of batter and fold into melted butter.
8. Fold butter mixture into original batter.
9. Pour batter into prepared cake pan and spread evenly. Bake for 7 – 10 minutes until sponge cake is golden brown, springs to the touch, and pulls away from the sides of the pan. 

Assembling the Baked Alaska
To see a video demonstration: https://www.youtube.com/watch?v=yZ2HLkokLcY&feature=youtu.be
1. Spray the loaf pan with cooking spray. Line the loaf pan with plastic wrap. Leave some plastic hanging over the loaf for easy removal.
2. Soften ice cream and/or sorbet. Place first ice cream in bottom 1/3 of the loaf pan. Put back in the freezer and let harden (this will make it easier to add the next layer). Repeat this process for the next two layers of ice cream and/or sorbet.
3. When the final ice cream/sorbet layer is in place, press the piece of cake (4” x 8”) on top of ice creams. Cover with the hanging plastic wrap and keep in freezer overnight.

Swiss meringue
200 grams egg whites
225 grams sugar
1/2 teaspoon vanilla extract
1. In the bowl of an electric mixer, combine all ingredients. Place bowl over a Bain Marie and whisk until the egg whites feel warm or slightly hot (like 130°F).
2. Place the bowl on the mixing stand and whip with whisk attachment on high speed for 3 minutes. Lower speed to medium and keep whipping for 2 more minutes.  The meringue should be room temperature by now. If not, keep whipping until it is room temperature.


3. While the meringue is whipping, remove the Alaska from freezer. Dislodge the ice cream from the pan using the excess plastic wrap for help.
4. Once the dessert is out of the pan, place on a nice oven resistant tray with cake side down.
5. Start with half of the Swiss meringue in a pastry bag fitted with star tip. Cover the entire dessert with Swiss meringue in any design that you prefer.
6. Put the Alaska in the freezer. Keep in freezer until 30 minutes before serving.
                                          
When Ready to Serve:
1. Preheat oven to 450°F for 10 minutes.
2. Put the Alaska in oven and bake for 5 minutes or until golden brown.
3. Bring to dining table immediately and slice and enjoy.
                                   
Or, if you prefer to flambé the Baked Alaska at the table:
Warm up 2 tablespoons of brandy and pour into a metal ladle very carefully.  Dim the lights in the dining room, use a match to light the alcohol and pour over the Alaska to the oohs and ahs of your friends.